Call Distributor allows users to create a fully customizable virtual call center. It provides businesses with an organized method of distributing calls to agents on any phone, regardless of their location or particular phone setup.
This walkthrough serves as a guide for configuring a Call Distributor. Take a look at these related walkthroughs for additional information:
This walkthrough will guide you through the configuration of each section. To configure a new Call Distributor, navigate to Call Management > Call Distributor. On the Call Distributors page, select Create a new Call Distributor.
The Call Distributor setup is segmented into three parts:
- Queue Configuration
- List Configuration
- Agents Configuration
Call Distributor - Queue Configuration
A queue is a generic term for a Call Distributor and is similar to a waiting room for callers when no agents are available to take their call. Each Call Distributor in the account is a queue. A queue slot is similar to a seat in the waiting room: if there are 5 queue slots or seats available, there can be 5 callers waiting on hold for an agent. When callers are in a queue and an agent becomes available, the first person in the queue is transferred to the next available agent.
Note: A caller will only enter the queue if there are no available (Open) agents when they enter your Call Distributor. If there are Open agents, callers will bypass the queue and be transferred to an agent immediately.

Step 1 – Configure the General Settings
Call Distributor Name: Give your Call Distributor a descriptive name.
Max People Waiting: Select the maximum number of callers allowed to wait in the queue at one time. To allow more callers to wait in queue at one time, add more Queue Slots by selecting Purchase Add-Ons from the My Account tab.
Max Wait Time: Select the maximum length of time a caller can wait in the queue to be transferred to an available agent. The maximum wait time can range from 20 seconds to 60 minutes.
If Max People Waiting or Max Wait Time is exceeded, the applicable caller is routed to a pre-determined application that you will configure on the Call Distributor – List Configuration page. A caller may also press 1 on the phone keypad at any time to exit the queue and route to the specified application.
Step 2 – Upload and Configure Hold Music
Click the Upload button to upload a .wav file to be played while callers are waiting in the queue. Uploaded .wav files are available for selection from the drop-down menus.
Click Add New to add a new audio clip in succession. The audio files will be played in the order they are listed. After the first audio file is played, the system will attempt to transfer the caller to an available agent. If no agent is available, the caller will hear the Still Waiting Prompt – see below for instructions on setting this up – and then the next audio file will be played. After all your audio files are played, the system returns to the first audio file.
To remove an audio file slot, select the red delete button.
Step 3 – Configure the Queue Callbacks
Enable Queue Callbacks: (recommended) This feature allows for the caller to opt-out of waiting on the phone for an agent and instead, receive a call back from the agent. The caller will not lose their place in line if these choose to receive a call back.
Request Caller’s Name: If turned on, this feature will request the caller's name before they hang up to personalize the experience when the call back is made at a future time.
Request Phone Number Extension: If turned on, this will request an extension from the caller. That extension is used when the outbound call is initiated by the call back function.
Step 4 – Configure the Prompts
Intro Prompt: This is what the caller hears when they first reach the Call Distributor and are placed in queue. This prompt is only played once at the beginning of the caller’s wait. Callers will not hear this prompt if there are available agents to take calls.
The
Intro Prompt can be played to the caller via Text-to-Speech or via an uploaded pre-recorded .WAV file.
Still Waiting Prompt: This message is played directly after the
Intro Prompt, and between the hold music audio files while the caller remains in the queue. You can choose to type text in the field below to be read via Text-to-Speech or upload a .WAV file.
Prompt Text: (not recommended) If you choose to have the system read Text-to-Speech, type the message in this field. There are a number of variables that can relay information such as how long a caller has waited in the queue and what number they are in queue. DialogTech always recommends using an audio file over TTS to provide the best caller experience. For the various parameter options, which can be used for TTS, please review our
Call Distributor Dynamic Variable guide .
Call Distributor - List Configuration
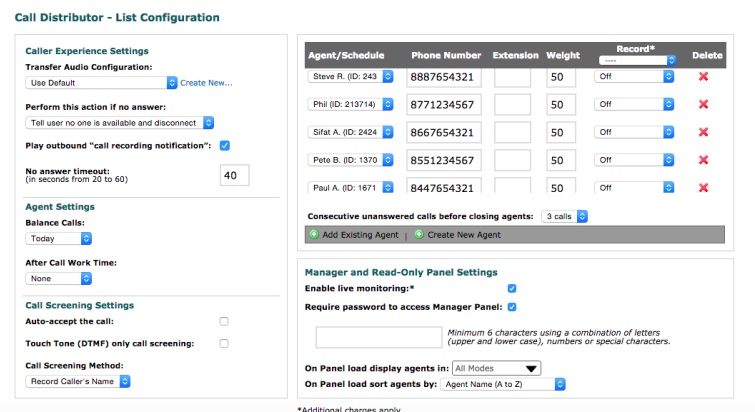
Step 1 – Configure the Caller Experience Settings
Transfer Audio Configuration: While on the List Configuration page of a Call Distributor, users can optionally customize the default audio configurations callers and agents experience. This setting is referred to as Transfer Audio Configuration.
By clicking on the Create New... link, a pop-up window will appear allowing users to create a new audio configuration and upload new audio files for each prompt. The audio file must be in a .WAV format. Once uploaded, the file will appear in the drop-down menus next to each prompt.
On the configuration page, give the custom prompt set an identifiable name. Then use the Upload button to browse for available .WAV files on a computer.
To remove a prompt for the configuration, select Blank Audio from the drop-down menu.
*Note - For users interested in knowing what each default prompt states to the caller, they can click on sample prompt text next to each prompt
Perform this action if no answer: From the drop-down menu, select the application to which callers will be routed if they exceed the Max Wait Time, exceed the Max People Waiting in queue, or opt-out of waiting in queue by pressing one. Select one of the following:
- Tell User No One is Available and Disconnect: Play the Finished Call prompt to the caller and end the call. This prompt can be customized via Transfer Audio Configuration.
- Virtual Receptionist: Transfer the caller to a Virtual Receptionist.
- Schedule Router: Transfer the caller to a Schedule Router. This enables you to base your No Answer Action on a schedule.
- Find Me: Transfer the caller to a Find Me list.
- Call Distributor: Transfer the caller to another Call Distributor.
- Locator: Transfer the caller to a Store Locator.
- SurVo: Transfer the caller to a SurVo (IVR).
- IVR: Transfer the caller to an IVR
- Voice Mail Greeting: Transfer a caller to a Voice Mail.
Outbound call recording notification: Check this box to play the message This call may be monitored or recorded for quality purposes to callers when your agents make outbound calls. Your state’s law may require a recording notification to both parties on a call. Please consult your attorney before recording any phone calls.
No answer timeout: Choose the amount of time (in seconds) that the system will call an agent’s number before determining there is no answer, and moving on to the next available agent. The No Answer Timeout can range from 20 to 60 seconds.
Step 2 – Configure the Agent Settings
Balance Calls: Choose the time frame on which to balance the incoming calls between your agents. Select Today, This Week, This Month, Hours, Days, or Agent Rank. The ratio of calls routed to an agent is dependent on the weight assigned to each agent.
- This Week/Month/Hour/Day - agents are weighted equally throughout the specified timeframe
- Agent Rank - gives users the ability to force calls to the highest weighted available agent. The highest weighted agent will receive every call that comes into the Call Distributor as long as they are open In the event that two agents are weighted the same, the system will enact a Round Robin calling sequence between those equally weighted agents.
After Call Work: After Call Work is an automated, timed mode that an agent enters after the completion of an inbound call. While in After Call Work mode agents will not be offered another call by the Distributor. This allows agents to finish up notes or other activities. Agents who complete their work before the After Call Work time runs out can manually change their status to OPEN and begin accepting calls again. If agents do not need any time between calls, set After Call Work to None.
Step 3 – Configure the Call Screening Settings
Auto-accept the call: (not recommended) Automatically connect the caller when an agent answers a call without prompting the agent to accept. This is useful if an agent’s phone number is answered by an IVR before the agent picks up or if you simply don’t want your agents to have to accept the call.
Touch Tone (DTMF) only call screening: (recommended) With the majority of Call Distributor configurations, agents are prompted to accept the call by saying yes or pressing 1 on their keypad. Agents can also deny calls by saying no or pressing 2, at which point the caller is transferred to another available agent. Choosing DTMF Only will disable voice recognition and require agents to use their keypad to accept or deny a call. This is a recommended feature if your agents will be working in noisy environments, as it’s possible that background noise can be interpreted as an invalid response if this option is not enabled.
Call Screening Method: Choose the method for relaying whisper message information to the agent answering the phone. A whisper message is a means of offering some information about the call to an agent before being connected to the caller such as "support call" or "call from radio ad".
Record Caller’s Name: Prompt the caller for their name and whisper it to the agent answering the phone prior to prompting the agent to accept the call.
Whisper Text: Text typed into this field will be read to the agent answering the phone as text-to-speech before they are asked to accept or decline the call.
Whisper Audio: Upload an audio file that will be played to the agent answering the phone before they are asked to accept or decline the call.
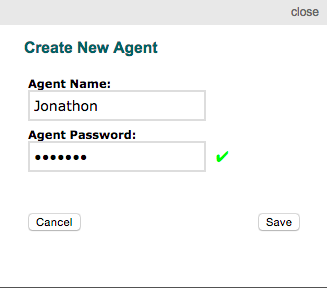
Step 4 – Add/Create and Configure Agents
Create New Agent: Click Create New Agent to create a new Call Distributor Agent. Enter a name for the Agent and the Agent Password in the pop-up window and click the save button. The new Agent appears in the Agent/Schedule section. Once the agent is created it is assigned an Agent ID. You will need to make a note of the Agent ID as the Agent will need it and the Password to access the agent panel.
Phone Number: Enter your Agent’s phone number in the Phone Number field.
Extension: If the Call Distributor agent is to be reached at an extension, you can enter it in the space next to the 10-digit number. If your agent does not require an extension, leave this field blank.
Weight: Specify a weight for your agent to determine how calls are distributed among agents. Weight is a ratio and does not need to add to 100. For example, if the weight is set to 20 for Agent A and 40 for Agent B, Agent B will be offered twice the number of calls offered to Agent A.
Record the call: Call recording is configurable on a per-agent basis for both inbound and outbound calls. Simply select Inbound, Outbound, or Both from the drop-down next to each agent. You can enable call recording for all agents using the drop-down in the column header. When individual agents have different recording settings, you will see a horizontal hash mark in the drop-down box.
Add Existing Agent: Click Add Existing Agent to add a previously created agent to this Call Distributor and select the desired Agent from the drop-down menu in the Agent section. Enter the Agent’s phone number, extension weight and, recording settings as described above.
Consecutive Unanswered Calls Before Closing Agents: From the drop-down menu, select how many calls in a row an agent may miss before their status is automatically changed to Closed. You may also select to never close an agent due to missed calls. By automatically closing an agent that has mistakenly left their status set to Open, you can reduce a caller’s wait time because you avoid transferring them to an agent that is not available to accept the call.
Note: To view or edit an agent’s Password, select Schedules from the main navigation menu at the top and click the Edit button associated with the agent.
Step 5 – Configure Manager and Read-Only Panel Settings
Panels are used by managers and agents to monitor the queue. Users can optional adjust the default settings for the manager panel in this section. For more information on these settings, please review our Call Distributor – Manager Control Panel Walkthrough.
Call Distributor –Agent Configuration
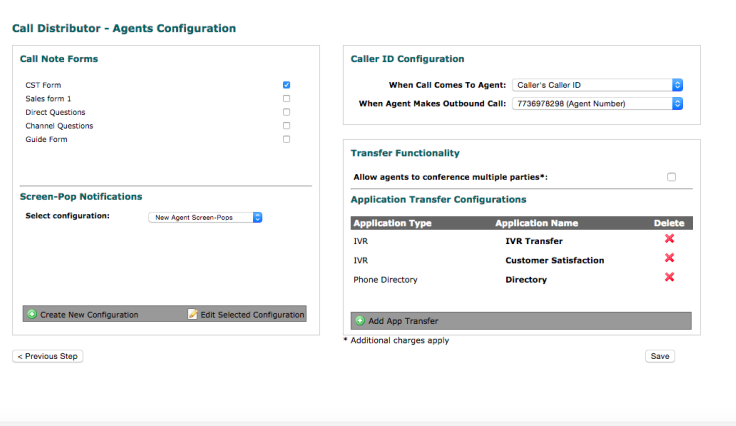
Step 1 – Select Optional Call Note Forms for Agents
Call Note Forms are customizable forms that can be accessed and submitted via the Call Distributor Agent Panel. For example, you can enable your agents to provide summary notes on calls or rate leads based on a scale that you determine. Call Note Forms can be created by navigating to Call Management > Distributor Forms.
Forms to Allow: Select the checkbox next to a Call Note Form to make the form accessible to agents for this Call Distributor via the Agent Panel. Note: If you have yet to create any Call Note Forms, you will not have any available for selection here.
Step 2 – Select and Configure Optional Screen-Pop Notifications
A Screen-Pop Notification provides information that will be displayed to the agent in the notification section of the Agent Panel when a call is transferred to an agent. This can help agents to be more prepared when they answer calls. For more information on this topic, please review our Screen-Pop Notifications guide.
Step 3 – Determine the Caller ID Configuration
When Call Comes to Agent: From the drop-down menu, select the phone number to be displayed on an agent’s caller ID and Agent Panel when a call is transferred to them. Choose to display the caller’s actual phone number (recommended), or select any of your DialogTech numbers or Registered Numbers (found under the My Account tab) to be displayed to the agent.
When Agent Makes Outbound Call: From the drop-down menu, select the phone number to be displayed to the receiving party when an agent makes an outbound call via the Agent Panel. This enables you to display your company’s main phone number to customers instead of the agent’s personal number. Select from any DialogTech numbers or Registered Numbers (configurable under the My Account tab).
Step 4 – Select Optional Application Transfer Configurations
Application Transfers enable agents to transfer callers to a pre-configured phone number or DialogTech application via the Call Distributor Agent Panel. Agents can always transfer a call to a 10-digit phone number. Note: When a caller is transferred, billing continues until the caller is ultimately disconnected.
Allow Agents to Conference Multiple Parties: Checking the box to Allow agents to conference multiple parties will give them an additional conference transfer option when they are talking on an inbound call. Conference transfer places the caller on hold while the agent dials a third party. The agent can then speak with the third party and then has the option to:
Return: reconnect to the caller on hold and hang up on the third party.
Join: conference together the caller, agent, and third party. The agent can hang up during the conference and the caller and third party will remain connected.
Transfer: connect the caller that is on hold to the third party without all three parties being on the line together. Transfer hangs up on the agent and returns the agent status to “Open.”
Add App Transfer: Click Add App Transfer and a pop-up window opens allowing you to configure a new Application Transfer.
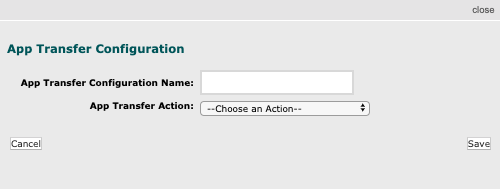
App Transfer Configuration Name: Give your Application Transfer a descriptive name. This is how your agents will identify it on the Agent Panel.
App Transfer Action: From the drop-down menu, select the DialogTech application or phone number to which an agent can transfer a caller.
Congratulations, the Call Distributor configuration is now complete!